

Simon Says Stamp - 3D Embossing Folders 3 Ways
- Keisha Diann
- Jul 13, 2021
- 4 min read
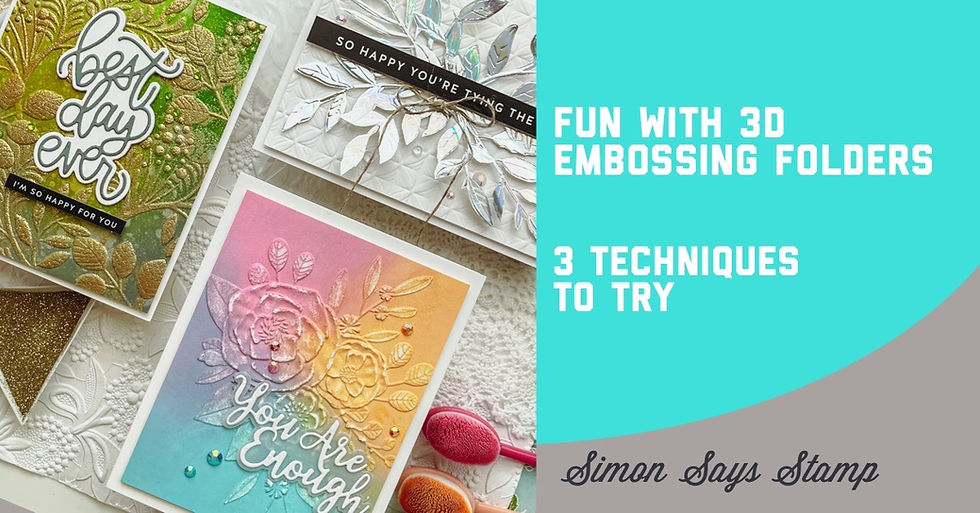
I love Embossing Folders and for a while I was worried that they may have outstayed their welcome, but then came 3D and embossing folders are definitely a thing again!
In June, Simon Says Stamp released 4 new 3D embossing folders and I am using 3 of them today to showcase 3 ways to use them that I have not tried before.
2 of these techniques will work on any embossing folder, 1 requires a folder with a large defined focal image.


In addition to the above folders you will need:
Key Supplies
Metallic Embossing Powder
Sanding Block
Distress Inks/Oxides
Craft Knife
So let me share a few tips on how I had fun with embossing folders!
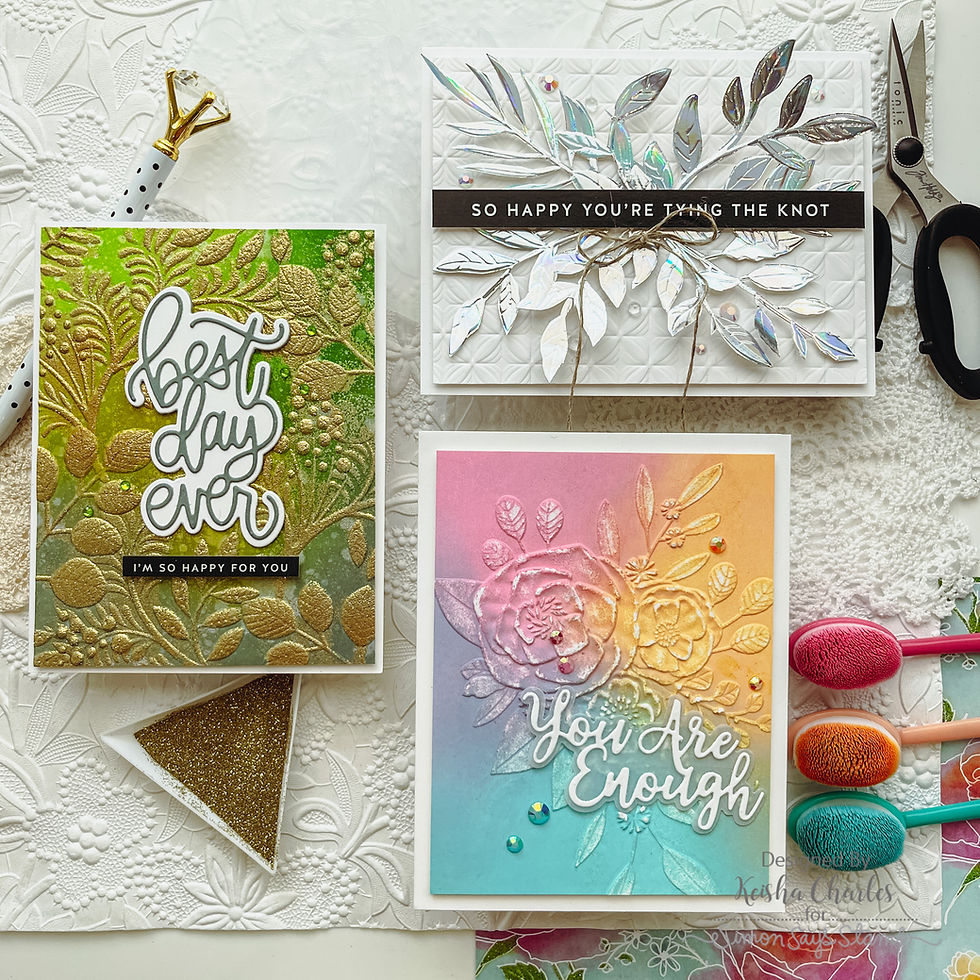
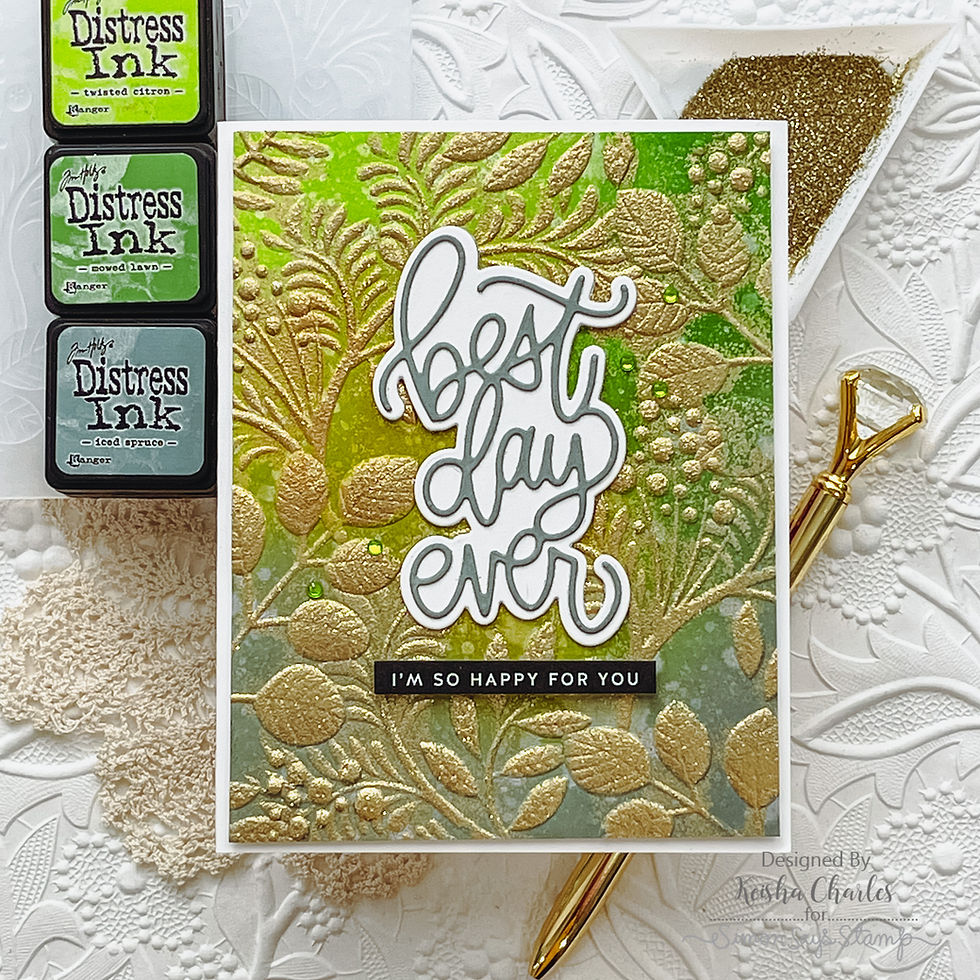
BEST DAY EVER CARD - Ink-blending, Double-Embossing with Metallic Embossing Powder
Size: 4 1/4" x 5 1/2"
Featuring:
Simon Says Stamp Reverse Sentiment Strips - All Things Happy
Distress Ink - Twisted Citron, Mowed Lawn, Iced Spruce, Crushed Olive
Additional supplies linked in the Supplies Gallery at the end of this post
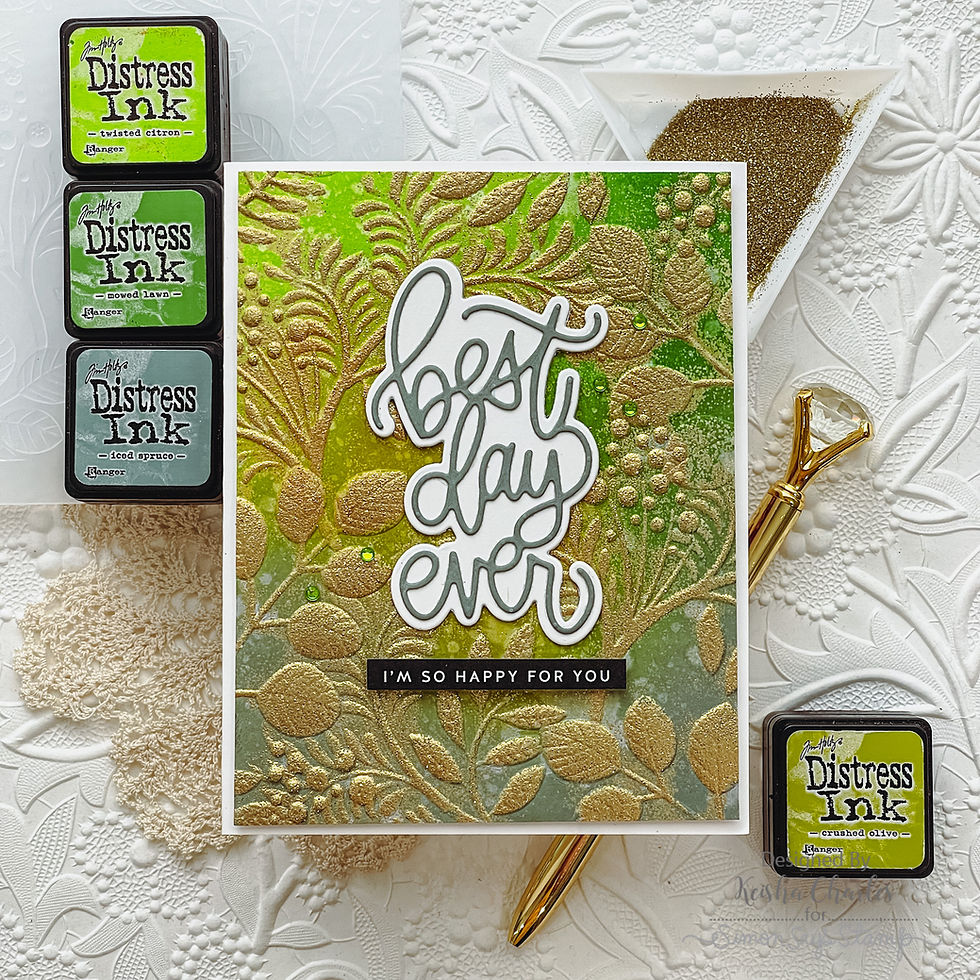
I discovered this technique in Nina Marie Trapani's YouTube Video and could not wait to give it a try. Please check out her video for a full walkthrough, I will highlight a few notes here on the path I took
Key Steps:
Use an embossing buddy to dust the surface of an A2-sized (4 1/4" x 5 1/2") piece of 110lb Neenah Cardstock
Emboss the Neenah Cardstock with the Vine Canopy 3D Embossing Folder. This is the 1st embossing
Lightly run the Clear Ink pad over the raised part of the embossed cardstock
Dust Glitter Metallic Gold Sparkle Embossing Powder over the embossed cardstock. Some of the powder will stick to the debossed (non-raised) parts of the cardstock, use a small dry paintbrush to dust some of it away in those sections
Heat emboss the remaining embossing powder. This is the 2nd embossing
Blend inks onto the double-embossed cardstock and then spritz with water to leave splotches. Trim to 4 x 5 1/2".
Embellish with Best Day Ever layered diecut and Reverse Sentiment Strip
Use foam tape to mount embossed layer to A2 card base to finish


I can't wait to do this again!
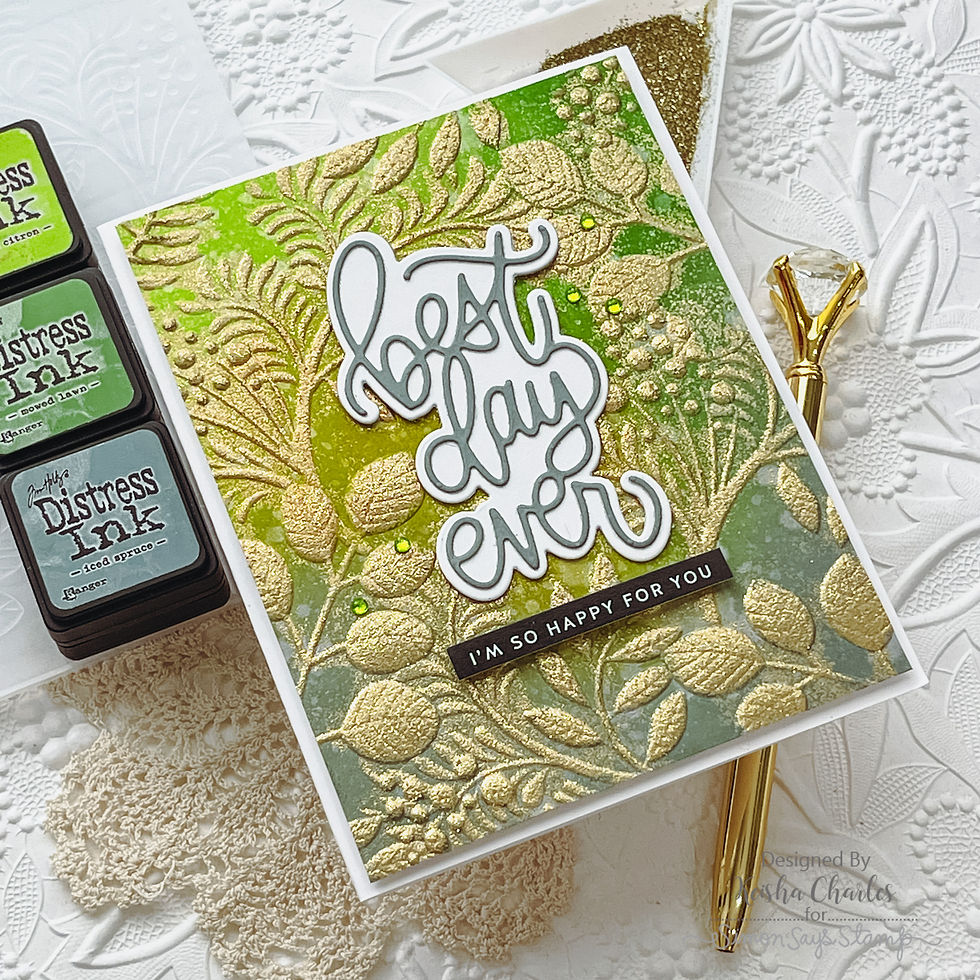
My wet-embossing here is messy and that makes it beautiful to me.
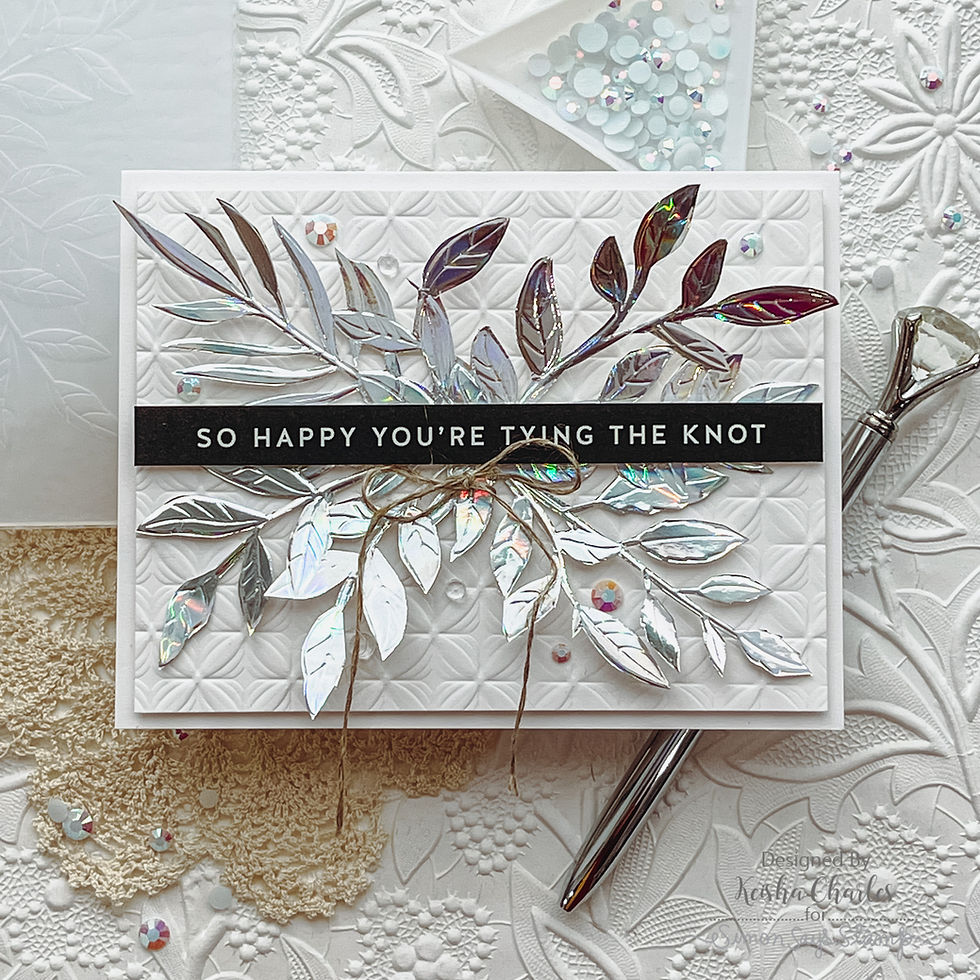
SO HAPPY CARD - Fussy cutting embossed image with a craft knife, layered on embossed card front
Size: 4 1/4" x 5 1/2"
Featuring:
Additional supplies linked in the Supplies Gallery at the end of this post
Key Steps:
Emboss an A2-sized (4 1/4" x 5 1/2") piece of Simon Holographic Cardstock with the Leaf Bundle 3D Embossing Folder
Use a craft knife to cut out the embossed leaf bundle pattern
Emboss a 4" x 5 1/4" sheet of 110lb Neenah Solar White Cardstock with the Lumen 3D Embossing Folder. This will be the card front.
Adhere the fussy-cut embossed leaf bundle pattern to the embossed card front. Add foam mounted Wedding Reverse Sentiment Strip and adhere
Tie a bow with the twine around a leaf stem under the Sentiment Strip
Adhere pearls and with Bearly Craft Glue to the card front and use foam tape to mount to A2 card base to finish.


All pretty and sparkly!


All done!

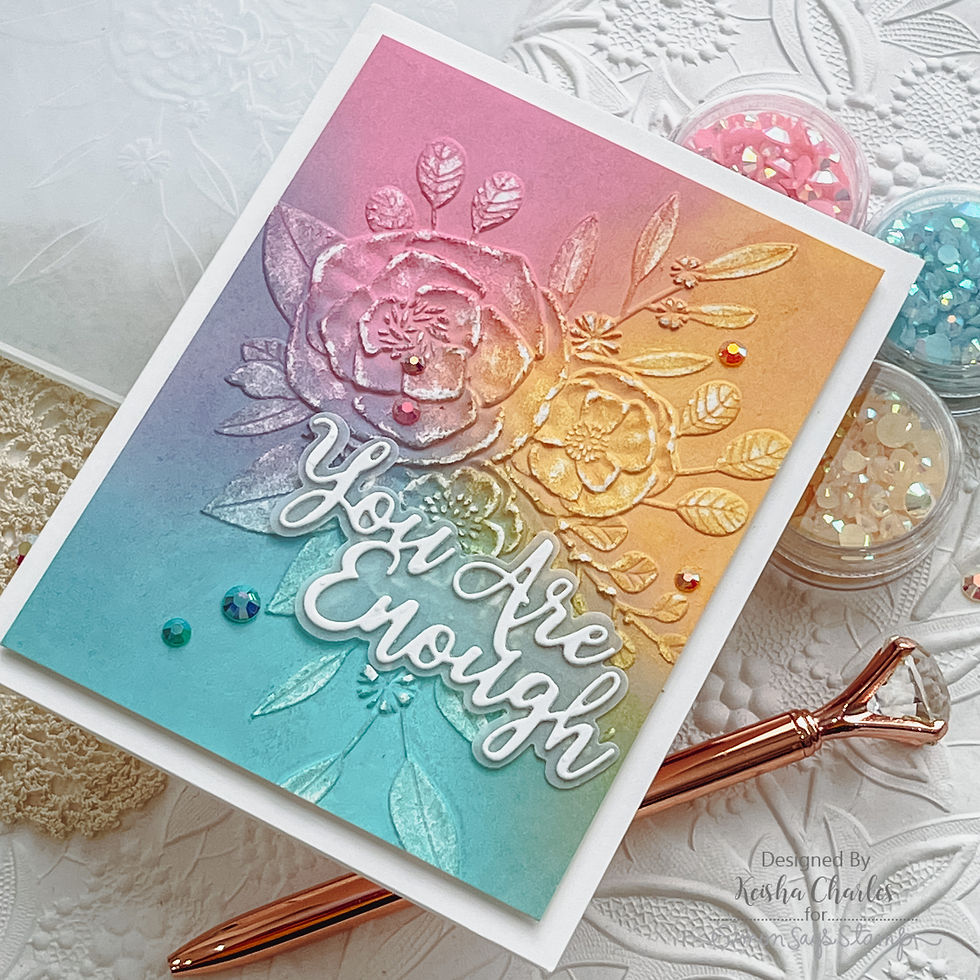
YOU ARE ENOUGH CARD - Ink-Blending Distress Oxides
Size: 4 1/4" x 5 1/2"
Featuring:
Distress Oxides - Kitsch Flamingo, Salvaged Patina, Dried Marigold
Paper Artsy Sanding Block
Pink Fresh Studio Jewels - Ballet Slipper, Peach Fuzz, Sky Blue
Additional supplies linked in the Supplies Gallery at the end of this post

I got this idea from one of the amazing Jennifer Mcguire's videos on using embossing folders linked here.
Key Steps:
Emboss an A2-sized (4" x 5 1/4") piece of 110lb Neenah Solar White Cardstock with the Roseville Bouquet 3D Embossing Folder
Ink-blend the 3 Distress Oxide colors onto the embossed cardstock
Speed up drying with a heat tool if you prefer
Sand embossed (raised) parts of the cardstock with sanding block to remove the first colored layer of the cardstock and reveal the white. Trim to 3 3/4" x 5"
Prepare the You Are Enough diecut using vellum and white cardstock and vellum and adhere to the card front
Adhere pearls with Bearly Craft Glue to card front
Use foam tape to mount to A2 card base to finish.


Steps 5 and 6:


Let me know in the comments which card is your favorite today.
Full supply list below for your shopping convenience.
See you soon Lovelies!
SUPPLIES:
I listed the products that I have used below. Please note that these are compensated affiliate links used at no cost to you. I really appreciate your support. Simon Says Stamps Rainbow Release and some other products were provided as part of my Design Team package. Click on the icons below each product picture to shop with SimonSaysStamp.com.
I love embossing folders, I actually use them way too little but I don't think one of them is a 3D folder. What a stunning cards did you make with these gorgeous folders, love that used different techniques. Thank you so much for this great inspiration, stay safe and have a wonderful day.