Hi Lovelies!
Hello Lovelies! New month means new wall decor in my Craftroom. This time, I am using the Summer Bouquet Stencil again, but this time with a lot of color and shimmer for the sunny days of August.
For this project we will double up on the stenciling, first with some Pawsitively Saturated ink, then with some Stickles Glitter Glue.

Normally, I am not fond of stencils like this with thin lines like this one because I am always making smudges, but I did gradient ink-blending AND applied a glittery paste with no issues!
Let's take a look at the key supplies.
For the full list, check out the Supplies Section at the end of this post.
Today's GIF!
This is me, finishing almost every crafting project!
Like this card and my corny GIFs? CLICK BUTTON BELOW
to sign up for blog updates:
GRATEFUL HEART WALL ART - Ink-blending, Stenciling, Stamping and Die-cutting
Wall Art Base: 8" x 8"
Stamped Layer: 5 1/2" x 5 1/2"
Featuring:

COLOR PALETTE
We will ink-blend through the stencil using a selection of pink, yellow, orange and green Simon Says Stamp Pawsitively Saturated Inks.
PROJECT WALKTHROUGH
STENCILING THE BACKGROUND

Trim a sheet of 110LB Neenah Cardstock to 6" x 6", cover with the Summer Bouquet Stencil and secure both to your craft service with painters tape.
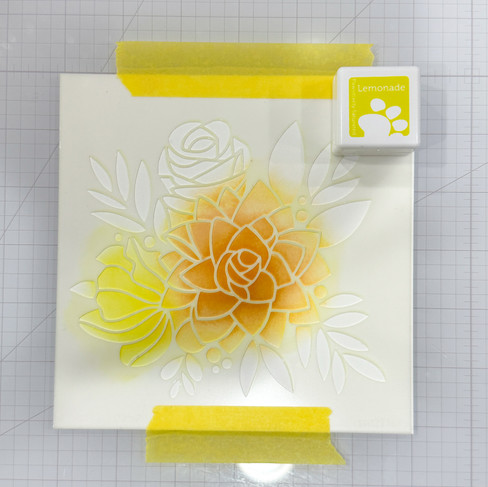
1st Layer of Stenciling
Use the Simon Small Blending Brushes and selected ink colors ink-blend the floral image through the stencil. The colors used are : Melon, Cantaloupe, Lemonade, Limelicious, Peony (not shown), Sherbet, and Pearlicious.
Close-up to see the colors better.

2nd Layer of Stenciling
Use a palette knife to apply the Stickles over the stencil quickly and evenly. Lift the stencil away immediately when complete and wash.
Trim to 5 1/2" x 5 1/2" when dry. 2nd layer done!

DIE-CUTTING/INK-BLENDING THE SENTIMENT
Die-cut the 3rd largest heart form the Nested Heart set out of 110lb Neenah Cardstock.
Ink-blend with Peony and Melon Inks.
Stamp the sentiment using the Cultivate a Garden Stamp Set in Intense Black ink on the ink-blended heart.

CREATING THE INSERT BASE
Using the Tim Holtz Guillotine, trim 2 pieces of Chipboard to 8" x 8" and ~5 1/2" x 5 1/2". Trim 1 sheet of 130lb White Cardstock to 8" x 8".
Adhere the stenciled layer to the ~5 1/2" x 5 1/2" chipboard and the white cardstock to the 8" x 8" chipboard using the Elmer's Spray Adhesive or Craft Tacky Glue
NOTE: If you did this project with me before and plan to switch out a previous insert for this one, you do not need to create the 8" x 8" white backdrop again out of 130lb white cardstock. The inserts are attached to the backdrop with Velcro, so you just pop the previous one off and attach the new one.
I placedmy sentiment on the bottom right of the insert, but you can try other locations that might appeal to you more. :-)

Attached some Velcro or the hook and loop stickers I linked in the supplies to the back side of the stenciled layer. Tip: I would use at least 2 at each of the four corners to ensure that it stays in place when mounted.
The second photo shows the other side of the Velcro once I removed the protective layer shown in the first pic and pressed the stamped layer onto the 8" x 8" white cardboard-backed layer.
The Chipboard backing and velcro under the stenciled layer helps it "float above" the 8"x8" layer.

The sentiment stands out against the shimmery back drop!

A few gold jewels are my finishing touch for this one!

For a cranky-pants like me, this is a perfect reminder to be more appreciative!

Don't forget to leave me a comment and let me know if you have any questions.
Thanks again for stopping by and I hope to see you again soon Lovelies!
SUPPLIES:
I listed the products that I have used below. Please note that these are compensated affiliate links used at no cost to you. I really appreciate your support. Simon Says Stamp Just A Note Release products were provided as part of my Design Team package. Click on the icons below each product picture to shop with SimonSaysStamp.com.


Comentários