

Tim Holtz Sizzix Halloween 2024 - Wicked Batty Sign
- Keisha Diann
- Aug 3, 2024
- 4 min read

Hello Lovelies! I'm still not convinced that Halloween is my thing, in that I'm not usually inspired to do anything scary or gory, but I feel like Halloween is so much more than that. I've seen many makers create cute, funny or sassy Halloween makes, for me I somehow ended up with a combo of colorful and creepy for Tim Holtz and Sizzix's Halloween 2024 Release!
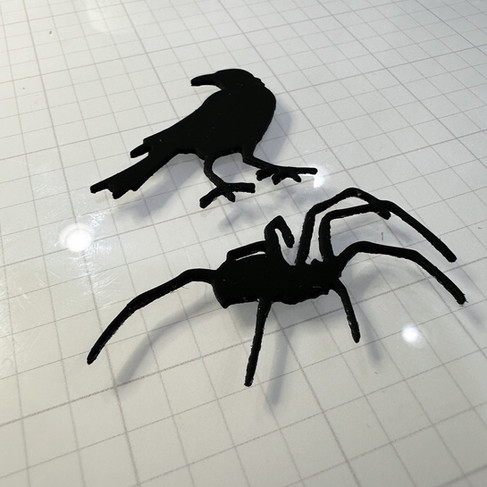
With the colorful background being so bold, I zeroed in on the Gothic Portraits set, kept all the die-cuts black, and focused on creating a swarm of bats and a rather majestic spider topping off the scene.

Let's take a closer look at both of the sets. You can purchase them individually or get the whole bundle from Simon Says Stamp.
Tim Holtz|Sizzix GOTHIC PORTRAITS Die Set

Tim Holtz|Sizzix Halloween 2024 I Want It All Bundle

I need to make special mention though about the Distress Black Heavystock that I used for all the die-cuts. It is literally the blackest, most luxurious, inky cardstock which feels velvety to the touch and it makes these unaltered die-cuts look fabulous!

Click here to view the full supply list or check out the one linked in the gallery at the bottom of this post when you have finished exploring this project.
Today's GIF!
Okay, I think we have a fan of the bats!
Like this card and my corny GIFs? CLICK BUTTON BELOW
to sign up for blog updates:
WICKED BATTY SIGN - Alcohol Ink Background, Die-Cutting and Stamping
Sign Size: 6" x 8"
Featured Supplies:
Tim Holtz Sizzix Vault Gothic Portraits Thinlits Dies 666681
Tim Holtz Distress 8.5 x 11 Black Heavystock Ranger tda79293
Tim Holtz Idea-ology HINGE CLIPS Nickel Metal Hardware TH92692
Tim Holtz Ranger Alcohol Ink - Boysenberry, Wild Plum, Crimson, Dandelion, Meadow

PROJECT PALETTE
I've been using Sarah Renee Clark's Color Cube system a lot lately and today's project was no exception. Once I selected Color Card 092, I picked up my ring of Alcohol Ink swatches and selected several colors that were similar to the 5 color families on the Card.
Tim Holtz Ranger Alcohol Ink - Boysenberry, Wild Plum, Crimson, Dandelion, Meadow
Tim Holtz Ranger Alcohol Pearl - Splendor


I also save palettes to my Color Combos board on Pinterest; love this also, especially because it's a FREE option! :-)

PROJECT WALKTHROUGH
ALCOHOL INK BACKGROUND
NOTE: In addition to the supplies listed, you will need some 91% Rubbing Alcohol from your fravorite pharmacy.
Place a 5" x 7" piece of White Yupo Heavystock Paper onto a Non-Stick Craft Mat or Glass Mat.
Remove the cap from all the Alcohol Ink bottles.
Use a Fine Tip Applicator Bottle to randomly apply little patches of Rubbing Alcohol all over the paper.
Apply each color of the Inks onto the paper as shown starting at the top in the following order: Boysenberry, Wild Plum, Crimson, Splendor, Dandelion, Meadow
Use puffs of the Blower to move the ink around, mix a little with adjacent colors and dry into little patterns as you prefer. Dilute the colors using additional drops of Rubbing Alcohol as needed.
If you are unhappy about the pattern you are creating simply erase it using a generous amount of Rubbing Alcohol (like the 1st photo in the bottom row below) and reapply your ink colors working them with the blower until you achieve the background look you prefer.
The large photo beneath the grid shows the final look.


DIE-CUTTING
Die-cut the Distress Black Heavystock using the following:
Wicked sentiment (x 3)
Crow (x 3)
Spider (x 3)
Bats (both sizes, about 22)
Layer and adhere the sentiments, crows and spiders into a single piece using Bearly Craft Glue


CREATING THE SCENE
Place the die-cuts on the alcohol ink background in the following order:
sentiment
crow and spider
bats
Once they are placed to your liking, apply a piece of Glad Press N Seal over the die-cuts, pressing down carefully to ensure that they stick to the film.
Flip the alcohol background over and gently release only the background from the film, leaving the die-cuts in place.
Apply Bearly Craft glue to the die-cuts while they are attached to the film
Position the film over the alcohol background and then gently press down to adher the die-cuts to the background
Gently remove the film.


FINISHING THE SIGN
Trim the Simon Say Stamp Chipboard to 5" x 7" and 6" x 8".
Trim Distress Black Heavystock to 6" x 8".
Spray the back of the alcohol ink background with Elmer's MULTI PURPOSE SPRAY ADHESIVE CraftBond and adhere to the Chipboard of the same size. TIP: I do this outside in a carboard box.
Spray the back of the Distress Black Heavystock with Elmer's MULTI PURPOSE SPRAY ADHESIVE CraftBond and adhere to the Chipboard of the same size.
Spray the back of the Chipboard/alcohol ink background layer with Elmer's MULTI PURPOSE SPRAY ADHESIVE CraftBond and adhere to the Black Heavystock/Chipboard layer.
Stamp and emboss a strip of yellow cardstock with the phrase "Something Dreadfully" from the Tim Holtz Stampers Anonymous TINY TEXT HALLOWEEN (CMS409).
Pop up the stamped strip with foam dots and then adhere to the sign.Attach the Hinge Clips to the top of the sign.
Thread the yellow ribbon through the hole on the Hinge Clips. Tie and cut off any excess with Tim Holtz Tonic 6.75" Mini Recoil Snips.


Be patient with alcohol ink, keep going until you are happy!

Adding several layet to the sentiment, spider and crow creates some dimension allows them to stand out a bit amid the flurry of bats and coloruful background

Can it be wicked if it's so pretty?

Now just to find a place for it in my craftroom! I need to shorten the ribbon here as it's bumping into my pin display below. :-)

Thank you for stopping by and I hope this was helpful. Leave me a comment with your thoughts please. It really does make my day and I am always happy to take any questions.
See you soon!
SUPPLIES:
I listed the products that I have used below. Please note that these are compensated affiliate links used at no cost to you. I really appreciate your support. All new release dies used today were part of my maker package from Tim Holtz and Sizzix.
Kaiser OTC benefits provide members with discounts on over-the-counter medications, vitamins, and health essentials, promoting better health management and cost-effective wellness solutions.
Obituaries near me help you find recent death notices, providing information about funeral services, memorials, and tributes for loved ones in your area.
is traveluro legit? Many users have had mixed experiences with the platform, so it's important to read reviews and verify deals before booking.